Sunday, 18 May 2014

Apple Cake with Caramel Sauce

I've just move into my new home and I've been itching to try out my new oven, I've saved this recipe away wanting to try it when I have the chance and what better time than now. It's a very easy recipe but let me warn you that this is one of those calorie laden cake not for the waist conscious.


Apple Cake Ingredients:
340gm butter
1 cup caster sugar
1 cup brown sugar
3 eggs
3 cups plain flour
1 tsp baking soda
3 tsp ground cinnamon
1/2 tsp grated nutmeg
1/2 tsp salt
5 granny smith apples. peeled, cored and diced
1 cup chopped pecans
2 tsp vanilla extract


Method:
  • Preheat oven to 160 deg celcius
  • Using an electric mixer in a large bowl beat the butter and sugars until light and fluffy for 3 to 5 mins.
  • Add the eggs one at a time, beating after each addition
  • In another bowl combine the flour. baking soda, cinnamon, nutmeg and salt
  • Using a wooden spoon, gradually add the flour mixture to the butter mixture
  • The batter should be thick and sticky in consistency
  • Stir in the apples, pecans and vanilla
  • Scrape the batter into a buttered and floured 9 by 13 inch baking pan
  • Bake for 50 to 60 mins or until skewer comes out clean
Caramel Glaze

Caramel Glaze Ingredients:
4 tbsp unsalted butter
1/4 cup caster sugar
1/4 cup brown sugar
pinch of salt
1/2 cup heavy cream

Method:
  • In a saucepan over medium heat, melt the butter.
  • Add the sugars and salt
  • Cook, stirring frequently for 2 mins 
  • Stir in the cream and bring to a boil, stirring constantly for 2 mins 
  • Remove from heat and serve with apple cake and ice cream (optional)


Note that this is a very sticky batter do not expect the usual runny batter. The cake was really moist and the sauce complimented it well, you could also have it with ice cream.


Sunday, 4 May 2014

Green Tea Creme Brulee

I first ate this delectable dessert at Kobe Jones and it just left a lasting memory that I had to have it again. As always I relied on the good old google and it came thru for me. Creme brulee are those recipes that I'll never try to attempt as naysayers would keep you away from it at all cost because it's hard and complicated recipe best left to the professionals. But reading thru this recipe it did not seem too difficult or require a professional, what's more you would find that you already have most of the ingredients maybe except for the matcha green tea. So off I went to make it and prove the naysayers wrong.


Cream, milk and green tea
Ingredients:


  • 1½ cups heavy cream
  • 1½ cups whole milk
  • 1 Tbps. green tea powder (matcha)
  • 5 large egg yolks
  • ½ cup granulated sugar, plus 1 tsp. for each serving


  • Egg yolk with sugar

    Method:
    • Preheat oven to 150 degrees celcius
    • Place the cream, milk, and matcha into a medium saucepan over medium heat. Scald the mixture, stirring often, until it’s very hot to the touch but not boiled. Remove from the heat and let it cool. In the meantime, start a kettle of water on the stove.
    • In a medium bowl, whisk together ½ cup sugar and the egg yolks, until well blended and the mixture becomes pale yellow. 
    • Temper the egg and sugar mixture with the milk and cream, adding ½ cup at a time, whisking vigorously. You don't want to cook the egg by pouring the milk and cream too fast. 
    • Place a sieve over a large bowl and strain the mixture through the sieve. 
    • Divide the liquid between 6 medium ramekins. Place the ramekins into a large deep baking or roasting pan. 
    • Carefully pour boiling water into the pan to come halfway up the sides of the ramekins. 
    • Bake just until the crème brulee is set when shaken, but still trembling in the center, approximately 30-40 minutes.
    • Remove the ramekins from the water bath, cool to room temperature, and refrigerate for at least 2 hours and up to 3 days. If you are storing them for more than 12 hours, cover tightly with plastic wrap.
    • Remove the crème brulee from the refrigerator for at least 30 minutes prior to browning the sugar on top.

    To serve, spread about 1 tsp. of sugar on the top of each ramekin. Tap the side of ramekin to evenly spread the sugar and discard the excess sugar.
    Melt the sugar with a kitchen blowtorch until the sugar caramelizes evenly.* Allow the crème brulee to sit for at least 5 minutes before serving.

    Cream mixture added into egg yolk & sugar mixture

    Creme brulee in a water bath before going into oven


    I was really happy at the way the creme brulee turn out and guess what it was really that simple to make and it definitely cost me half of what I would pay at a restaurant. Each mouthful was sweet and crunchy from the caramelise sugar, followed by the slight bitterness of the green tea custard.


    Caramelise sugar on the top


    Tuesday, 29 April 2014

    Churros with Chocolate Sauce

    T my daughter loves Churros, well I do not know is it really the spanish doughnuts that she likes or the enjoyment of dipping it into the chocolate sauce, whatever the reason she was the one got me to find a recipe and make it for her. When I was finding and reading thru the vast numbers of recipes that was available online I was surprise at how easy it was to make. I felt a little ripped off at the number of times I had spent buying 3 Churros with dipping sauce for a whopping $8.95 from San Churro anyway never again as I have learn from my errand ways.


    Churros Ingredients:

    • 50gm butter melted
    • 1/2 tsp vanilla extract
    • 250gm plain flour
    • 1 tsp baking powder
    • 1 ltr sunflower oil
    • 100gm caster sugar
    • 2 tsp cinnamon 

    Method:
    • Boil a kettle of water, then measure 350ml into a jug and add the melted butter and vanilla extract.
    • Sift the flour and baking powder into a bowl with a pinch of salt, Make a well in the centre, then pour in the contents of the jug and very quickly beat the flour together with a wooden spoon until lump free.
    • Rest for 10 to 15 minutes.
    • Fill a large wok or deep saucepan with the oil. Heat until a cube of brown bread browns in 45 seconds.
    • Fit a star nozzle to a piping bag, fill with the rested dough, then pipe 2 to 3 strips directly into the pan, snipping the end with a pair of kitchen scissors.
    • Fry until golden brown and crisp, then remove and and drain on a oil absorbent paper. 
    • Mix sugar and cinnamon in a bowl and toss with the fried Churros to coat it.
    • Serve with the chocolate sauce for dipping

    Chocolate Sauce Ingredients:
    • 200gm dark chocolate 
    • 100ml double cream
    • 100ml full cream milk 
    • 3 tbsp golden syrup 
    • 1/2 tsp vanilla extract 
    Method:
    • Put all the sauce ingredients into a pan and gently melt together, stirring occasionally until you have a smooth shiny sauce. Keep warm on a low heat.


    As you can see this recipe took no effort at all but the taste was just heavenly T had a friend over for a play date and the two girls would have almost devoured the whole plate of Churros if I did not restraint them. The only thing that I would do differently is to use a smaller nozzle to pipe I use a wilton 1M and as you can see from the picture below the churros turn out distorted.


    Sunday, 27 April 2014

    Kobe Jones - South Wharf


    This is probably one of those restaurants that I will not normally book for a dinner out due to the known fact that a night out for a meal in one of this joints could cost an arm and a leg. But when I saw a deal that Cudo was having which is $59 per head for a nine course meal, I thought that was a reasonable price to pay compared to the original $135 per head it would normally cost.

    Me and hubby arrived to a not overly busy restaurant which was a little strange as it was a Friday night. They did not have a wait staff at the entrance of the restaurant so we had to wait for the waitress to finish serving the other patrons before they notice us and got us seated. 

    The waitress place our napkins on our laps and proceeded to take my vouchers and told us that our courses will start shortly. I was disappointed though for a posh restaurant they had disposable chopsticks that you get from a take away shop but I guess the view of the lights from the wharf made up for it.

    Here's what we had in our nine course meal in the order they were served:


    Number One Special
    Crab salad stuffed with avocado, the wrapped in kingfish and baked with Kobe Jones secret sauce


     Wagyu Tenderloin Tataki
    Seared and chilled, served with garlic, ginger and ponzu sauce


    Volcano Roll
    Oven baked scallops layered on a crab salad avocado roll, with special cream sauce and sesame seed and shallot sprinkle

    Prawn and Vegetable Tempura
    Two prawns with seasonal vegetables served with dipping sauce


    Calamari Fritto
    Pineapple cut calamari lightly fried in special panko


    Rainbow Roll
    Tuna, salmon, kingfish, snapper, prawn and avocado, layered on a crab salad and avocado roll, with sesame seed sprinkle

    Green Tea Salmon
    Warmed and seared, three hour cold smoked salmon, marinated in green tea served with watercress salad (Forgot to take picture of this course as we were too eager to sink our teeth into it)


    Wagyu Hot Rock
    Self cook wagyu on a hot plate, served with seasoning and two dipping sauce


    Ama Ozen
    Kobe Jones famous selection of dessert samplers with their trademark chocolate chopstick (we had the coffee and black sesame ice cream, green tea creme brulee and cheesecake)


    We enjoyed each course but if you asked me if it was worth paying the original $135 per head I would say no as most of the ingredients were simple everyday stuff you can get and the portions were pretty small.


    Location: 
    G16/38 Sidderley St
    WTC Wharf
    South Wharf


    Riverside Teppanyaki by Kobe Jones on Urbanspoon

    Monday, 24 March 2014

    Raspberry Friands

    I had a group of my close girl friends over for a baking session at my place because what is more fun than baking well it has to be baking with great gals. Since most of them do not bake often I decided to start with this fairly easy recipe which requires no effort at all. It's a one bowl recipe where you prepare the dry ingredients and mix it in with the wet ingredients.


    Ingredients:
    Melted butter to grease
    Plain flour to dust 
    195gm pure icing sugar sifted
    75gm plain flour sifted
    155gm almond meal 
    3 eggs lightly whisked
    180gm butter melted
    100gm frozen raspberries
    2tbsp flake almonds
    Icing sugar to dust

    Method:
    1. Preheat oven to 180 deg, brush a muffin tin with melted butter and dust with plain flour.
    2. Combine the sugar, flour and almond meal in a bowl. Make a well in the centre. Add egg and butter. Stir well until combined.
    3. Divide among among the muffin tin. Place a few raspberries in the centre and sprinkle with flake almonds.
    4. Bake for 15 to 20 minutes or until light golden. Set aside in the pans for 5 minutes to cool slightly before transferring to wire racks to cool completely.
    5. Dust the friands with icing sugar to serve.


    We enjoyed the fruits of our labour with a nice cup of tea and gal chit chat, what a great way to spend a Saturday afternoon. This is one of many baking sessions to come, look out for it.

    Friday, 14 March 2014

    Flourless Chocolate Cake

    I usually bring what I bake to work as most of the time it will be too  much for me and my family to finish all by ourselves and also because we do not want to add onto much to our expanding waist line. Recently we had a colleague who join our team who was gluten free and she always ends up missing out on the treats I bring in. So just for her I decided that I'll bake a gluten free cake so she won't have to miss out.
    This is an easy to follow idiot proof recipe and it did not take any effort at all except for whisking the egg whites which in today's modern kitchen there's always a mixer handy to assist.
    Ingredients:
    200g dark chocolate
    200g butter
    60ml hot water
    30g cocoa powder
    4 eggs separated
    300g brown sugar
    155g hazelnut meal
    2tbsp coffee liqueur
    cocoa powder to dust
    Method:
    • Preheat oven to 180 deg. Grease and line the base of a 23cm square cake pan.
    • Combine chocolate, butter, water and cocoa in a saucepan over low heat. Cook, stirring, for 2 to 3 minutes or until mixture is smooth. Transfer to a large bowl.
    • Add egg yolks, sugar, meal and liqueur, stir to combine.
    • Use an electric mixer to whisk egg whites in a clean, dry bowl until soft peaks form. Add one third of the egg white mixture to the chocolate mixture and gently fold until just combined. Add remaining egg whites and fold until just combined.
    • Pour into the prepared pan, smooth the surface. Bake in preheated oven for 40 minutes or until a skewer inserted comes out clean.
    • Set aside for 10 minutes to cool. Dust with cocoa powder, cut into squares and serve.
    T my daughter could not wait to have a piece of it and she had it with vanilla ice cream. She said it was rich and chocolatey, love every bite of it. I had the cake 5 minutes longer in the oven than required so the corners are a little burnt but that did not affect the overall taste of the cake. It was still really rich and moist.

    Tuesday, 11 March 2014

    Pabu - Collingwood

    We celebrated our wedding anniversary at Pabu a Japanese Sake & Grill no frill joint which serves tapas size shared portions. I had to book two weeks in advance as this place is pretty popular and you won't get a table trying to book it a day before I should know as I tried and failed. So to be safe I make reservations well ahead of time to guarantee a spot.
    The moment we stepped into the restaurant we were greeted by enthusiastic staff, our wait staff  showed us to our table that had the reserved tag. She handed us our menu and explain how the concept worked and even suggested a few of their best sellers without hesitation we ordered them.
    We had reservations for 7.30pm so by the time we got there we were famished and fortunately we did not have to wait for long before our dishes got served to us. As soon as one dish was finish the next one arrived to our table, I like how it flowed one after another.
    Tempura Vegetables
    First was the tempura vegetables note that I cannot remember the name of the dishes as they were in Japanese so I have given you what I thought the dish was. The batter was light and crispy and not at all greasy. The vegetables were still fresh and crisp.
    Gyu Tataki
    Then it was followed by the gyu tataki which was thinly slice beef drizzled with mayonnaise, spring onions and ginger. The beef was so fresh it just dissolved in your mouth, the dressing had the right balance of sour, spice and sweetness. The spring onions and sesame seed gave it crunch.
    Chicken Kaarage
    Next came the chicken kaarage which they use the chicken spare ribs part which was nicely coated with batter and fried to crispy golden perfection, the meat was juicy and tender as you bite into it. It was serve with wasabi mayo that left a good heat as it dissolve on your tongue.


    Salmon Sashimi


    We were recommended the kingfish sashimi but I was not a fan of kingfish so we opted for the salmon instead, and again this dish did not fail. The salmon was fresh and got quite a few pieces from the small serve we ordered.


    Soft shell crab

    We are a big fans of soft shell crab so we did not think twice of ordering the next dish, the crab was fried to golden crispiness and there was no hint of grease on it. It was serve with a light salad with mayo dressing and sweet chilli sauce.


    Mixed grill


    The dish up next was the mixed grill which was one of their chef recommendations, it consisted of chicken balls, pork belly, beef steak, tofu skin and chicken pieces. each serve with their own individual dressing sauce on top. All of it was good although we all agreed that the best was the chicken balls and tofu skin.


    Sizzling beef teriyaki


    Each dish that was served up was a treat to the senses and the sizzling beef teriyaki was no different, the beef was tender and the teriyaki sauce complimented the dish well. It was serve with mash sweet potato on the side which was really good too.


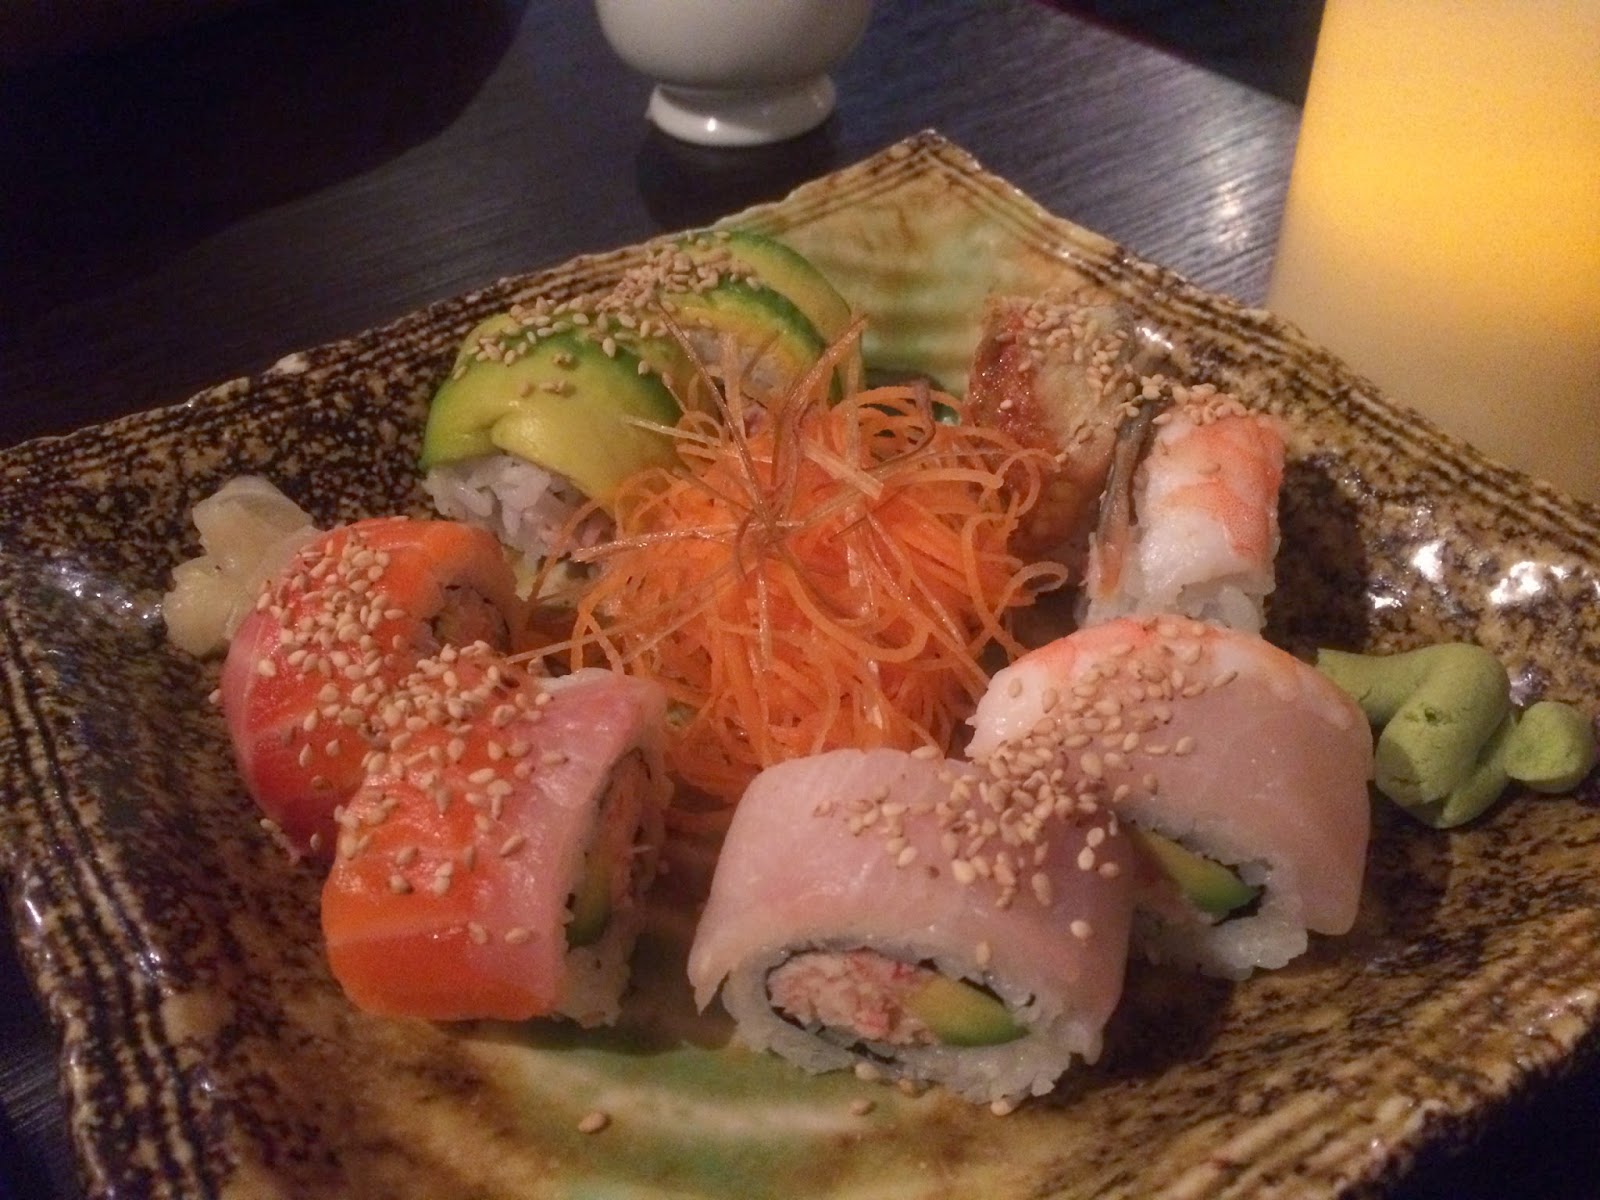
    Soft shell crab roll

    By this time we were full and we had one last dish to go, which was the soft shell crab sushi roll that came in a generous size. They had a generous serving of crab in the roll and although we were full each mouthful was just a delight. The spicy mayo left a slight heat on the tongue nothing too hot that we cannot handle.
    Overall we enjoyed the experience at Pabu and will definitely be back over and over again. And if you have read my review I suggest you make reservations soon to try it out yourself.


    Location:
    190 Smith St
    Collingwood
    VIC 3066
     Pabu Grill & Sake on Urbanspoon